


The Dryer Box - Sunday, November 14, 2004
The interesting thing about doing projects around the house is that you find out all of the places where the builders took short cuts. This certainly was the case when I set out to replace the clothes dryer hook-ups in our laundry room.
It started out as a simple idea. Because of the inconvenient location of the vent, gas, and electric hook-ups, the clothes dryer had to be placed about 8 inches from the wall. My goal was to add a drywall insert called a Dryer Box, which would allow me to push the dryer all the way against the wall. In addition, I also wanted to move the electrical outlet, and (possibly) the gas line.
My first goal was to remove the existing outlet box, and install a wall-mounted one. Because I had access to all of the wiring from underneath, in the basement, this was pretty straight forward. At this time I decided to leave the gas line alone as it only stuck out about 2 inches from the wall (not to mention I didn't want to do it myself.)
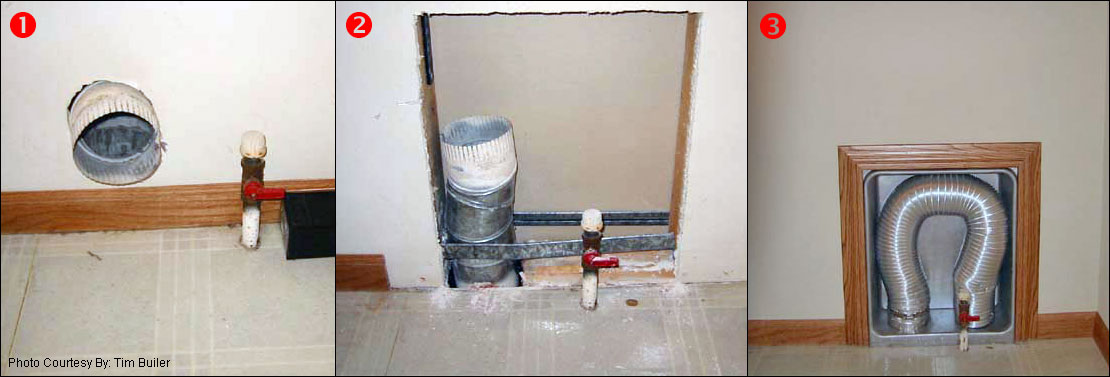
I was now read to install the Dryer Box itself. It was at this time that I wondered, how did they get a 4 inch duct in the wall where the studs were only 3 1/2 inches wide? If you look closely at the above picture you can see from the pattern in the vinyl that wall bows out slightly just underneath the duct vent. That figures. At least the extra 1/4 inch from the metal strips, plus the drywall itself would give me the 4 1/4 inches that I'd need in order to get the Dryer Box to fit.
As it turned out luck was on my side that day. When I cut out the drywall for inserting the Dryer Box, the Duct was in a perfect position (on the left side) to fit in the aluminum insert. Not only that, but if you look closely at the image to the right, you'll notice a black bracket on the left stud. This was to hold up a PVC pipe about 1/4 inch above the top of my cut out hole. If that PVC pipe were an inch lower, my whole project would have to have been scraped.
The other interesting fowl-ups I found at this point, were the metal strips holding duct in place. Everything I read about dryer vents said that you should never use screws, or even duct-tape when assembling your dryer vent. Lint can get caught on the screws and eventually block the pipe, and duct-tape doesn't hold up well against the heat. Only foil tape should be used, the ends should be connected with the male ends pointing towards the flow of air (again to avoid lint building up at the connection point).
So, not only am I saving space, but the new duct work should also be safer. Once I had the Dryer Box in place, I put some scrap trim that I had left over from the Computer Room project. The picture to the left shows the finished Dryer Box, as well as the new outlet in the upper right corner.
As it turns out, the gas line is exactly in the way so that I still can't easily connect the vent and slide the dryer up to the wall. I guess my luck can only hold so long. But I'll save that for another day. For now I can fit the dryer about 4 inches from the wall.
By The Builer's (Karla and Tim's Web Page)http://home.wi.rr.com/thebuilers/index.html
Email: tbuiler@wi.rr.com