


Elbow Eliminator - gain 5 foot of duct run Standard dryer exhaust duct-length criteria states that each 90° elbow you install reduces the allowable total length of dryer duct by five feet. Installing The Dryerbox® removes the need for a 90° bend penetrating the drywall, instantly gaining five feet of duct run.
Larger Appearing Laundry Room - Sales Tactic Because customers are so accustomed to seeing the dryer sticking out five or six inches from the wall, installing the Dryerbox® can have a big impact. When they walk through a model home, a keen eye will notice the unusual position of the dryer when it’s moved all the way back. This is a great moment for a sales agent to comment on the innovative, space saving and energy saving devices that you provide and how that attention to detail can be found throughout the house.
Try it! Walk into a laundry room with the dryer pushed all the way back. You will notice and feel the difference.
Advantages of using the Dryerbox
Dryer Related Service-calls Are Minimized Clothes dryers can be a nuisance when they become callback items for new-home builders. When the flex hose becomes squished, for example, exhaust efficiency is reduced and air movement is not sufficient to carry small particles of lint to the exterior.
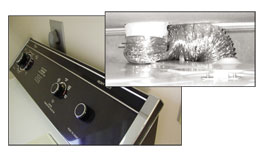 Due to this bottleneck, lint will collect in the flex hose and duct pipe until the homeowner notices that clothes are not drying (or until there is a fire). In most cases, the builder initiates an expensive service call only to find that the dryer was pushed back too far and air-flow was restricted. These types of dryer related service calls can be virtually eliminated with the use of the Dryerbox®. This simple receptacle allows the homeowner to move the dryer as far back against the wall as they desire with no negative effect to the efficient movement of air through the hose.
Clothes Dryer Building Code information (Summary of ICC Codes): 2003 IMC - International Mechanical Code (section 504) and 2003 IRC - International Residential Code (section 1501): In brief, the maximum length of duct permitted is 25 feet. This maximum length should be reduced by 2.5 feet for each 45° bend and 5 ft. for each 90° bend. The maximum length of exhaust duct does not include the transition duct. The duct should be a minimum nominal size of 4 inches in diameter and shall have a smooth interior finish.
- Locate the dryer right up against the wall
- Flex is protected from getting squished
- No trim-ring piece is needed
- Lint build-up is minimized
- Efficiency is increased
- Dryer related service calls are reduced
- "Elbow eliminator" - gain 5 foot of duct run
- Doubles as gas connection receptacle
- Can be installed in One-Hour wall
- Meets code requirements as a clean-out
- Laundry room appears larger to prospects
- Surface is paintable, no masking needed
- Applauded by building inspectors
- Reduces the fire hazard
- Socks and clothing less likely to fall behind appliance
- Prevents costly punch-out work to damaged 90
- Eliminates mold potential
- Can contribute up to 2 (USGBC) LEED credits
-
For The Building Contractor
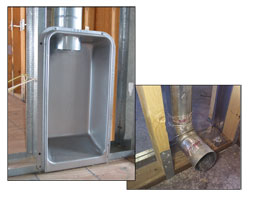
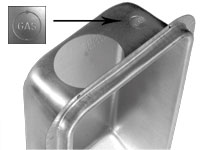
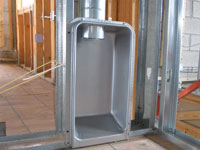 The Dryerbox® is sized to fit within 16” or 24” center studs. It only needs connection at three corners so no additional framing is needed. It is a very rigid 22 gauge aluminized steel with a Classification from Underwriters Laboratories to allow its installation in a one-hour rated wall assembly. Its 20” height provides for sufficient room to store the necessary length of recoiled aluminum flex. Ask about the Downbox™ for exhaust favoring a downward direction.
 -
For The Installer
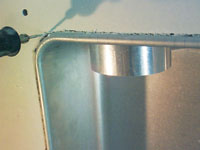
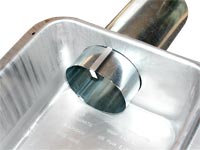 The Dryerbox® now includes a “duct support tab” in the top port that assists in maintaining the ideal penetration length of 2 inches for Snaplock rigid conduit. The installer simply creates a “hook” by bending the innovative tab at the two scored locations. The installer can then set in Snaplock pipe and continue with the balance of the duct run with minimal worry that the duct is too far into the receptacle.
 -
For The Plumbing Contractor
 The Dryerbox® features a “knock-out” port for a gas line, allowing for a convenient and space saving location of the gas valve and termination fitting. Click HERE for installation tips.
 -
For The Drywall Contractor
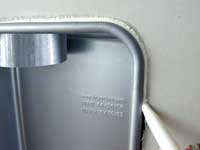
 The extension rim on the Dryerbox® protrudes 7/8” from the nailing flange offering a built-in corner bead. A Roto-zip (spiral saw) tool will cut out the opening just like any other receptacle, leaving a small crevice that gets caulked by the painter when he caulks the baseboard. The Dryerbox® is metal so the zip-cut bit head will not gum as it does with other plastic receptacles.
 -
For The Trim Carpenter
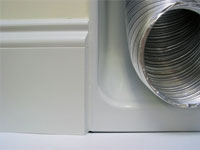 Once sheetrocked, the extension rim on the Dryerbox® protrudes about 1/4”, providing enough of an edge to butt the baseboard to. The easiest and best looking saw-cut is just a slightly back-cut angle. The Dryerbox® should not be installed above the baseboard as this defeats the purpose of the receptacle (to provide a protective space for the flex transition hose). All typical American dryers vent in the same location: at the very bottom and in the center of the appliance.
 -
For The Painting Contractor
 After the drywall contractor “zip-cuts” around the Dryerbox® receptacle, there is a small crevice between the drywall and the metal box that is easily filled with caulk. This built-in corner bead rim protects the drywall from damage and provides enough of a reveal for the trim carpenter to butt his baseboard to. The surface is already prepared for painting. No masking is necessary. You may “Orange Peel” and / or wall paint right over the aluminized steel.
 -
For The Architect
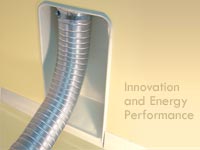 The Dryerbox® is GreenSpec listed and can contribute up to two U.S. Green Building Council (USGBC) LEED credits to the building project. One for optimizing energy performance and one for innovative design features.