


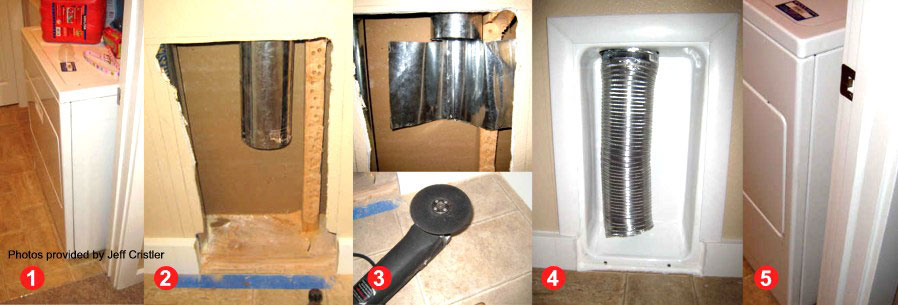
"Thank you for your product. I purchased a new home and the architect had neglected to allow for the dryer vent. I hear this is a common issue with new construction homes. I could not close the door with the dryer there. The builder's solution was to come in and put in a 6" smaller door. They said your product would not work. I would not stand for this and decided to take matters into my own hands. A 6" smaller door would shrink the opening so far you could barely get a laundry basket through the door. So then they came back wanting to swing the door into my living room, which would be a huge pain. You will notice that I had a non structural stud in the way and an air conditioning vent also in the way. I used the retro box for the install knowing I had 2 x 6 construction and would have to notch out the wood stud a bit to provide sufficient room.
I disagree with your install tips saying to grab a beer after you are done. I found it much easier to start cutting into a brand new home by having a beer first!!!
I came up with an innovative way to notch the stud. Using a 1 1/2 inch wood paddle bit, you can drill into the stud 4". Keep going down the stud until you have the notch you need. You can use a hammer to knock the pieces off not cut by the blade and then use the drill bit to smooth it out.
Another way to cut the pipe is with an angle grinder equipped with a cut off wheel. Cut into the pipe until the disk can't cut anymore. Then cut a straight line from the bottom of the pipe until you reach the part you cut. Bend the pipe open with a pair of channel locks and then finish your cut on the inside of the pipe. It goes very nice this way and cut's much faster than one of those tiny Dremel rotary cut off wheels. I used the drum sander on my drill to smooth out the burrs on the pipe. Wear ear plugs, with the grinder, this cut is LOUD!!!
To ease installation I held the dryer box off the floor 1/2 of on inch to allow for some room to squeeze it in. I also ground out the hole in the top of my dryer box to make the pipe install easier. I had the 2 x 6 wall so I had the clearance to do this. You will notice that I trimmed my dryer box out with typical door casing. This gave it a much better appearance and eliminated any drywall repairs and touch up. A person installing one of these should consider trimming it out to cover any dings in the wall they cause during the install. You can actually cut the hole a little bigger to allow easier install and then cover up any gaps. I actually opened up parts of the drywall to allow my tools to easily slip behind the dryerbox to pry it and the pipe into its place. I caulked the whole install and around the flooring to keep any drafts out.
Thanks again for your product and I hope this helps someone else out. I feel like I won with my builder by getting this fixed my way and the right way. Thanks for your help and a super innovative product."
By Jeff Cristler